Posts

Showing posts from March, 2021

How Ceramics Teaches You (and me) To Let Go

Image
Hello to anyone who is out there and stumbles across this lonesome, obscure blog.  Worm Ceramics here and I just wanted to write a bit about letting go and how that pertains to the ceramics process.  I've been frustrated the past couple days.  Mostly due to ceramics and the mistakes I've made.  Mistakes I probably could have prevented but was either being sloppy or didn't know I was detrimentally affecting the outcome of the piece.  In short, I've been coning wrong. Or sometimes I don't fuse two pieces of clay securely enough.  I've had a handful of cracks, ruptures, glazes that bubble. I've forgotten to sand down sharp edges, paint three layers of underglaze, touch up a bottom or sand down kiln wash that gets stuck to my pieces.  It kind of feels like I've been making mistake after mistake after mistake. Even though I know this is part of the learning process, it still hurts to think about my unintentional carelessness.  Anyways, I've been think...

Third Teapot Attempt

Image
Hello fellow Internet dwellers,  Worm Ceramics here again.  I'm on my third teapot and I'm here to update that progress has been looking really good thus far.  No hairline cracks yet!  So, I threw on the wheel as usual. Still having trouble gaining height, which is why my teapots are quite squat in shape.  This one will be a bit bigger than what I intended. I'm really inspired by Chinese and Japanese teapots, I love the compact, bulbous and squash shapes that they normally possess.  Anyways, I took a chance and trimmed the teapot at the studio while he was probably still too wet, but I was delicate with the pressure and only lost control of the needle tool momentarily when I was trimming the outside of the lid.  So, took him back to my house, pulled the handle, fluted the body, decorated the lid, and am quite content with the outcome of how he's looking.  Will bring him into the studio tomorrow to dry out some more and hopefully be bisque fired th...

Let's talk about a bulbous mug

Image
Hi Internet world,  Worm Ceramics here. I just wanted to share this post about one of my flower mugs that I recently got back from the studio.  I made four of these free-form mugs on the wheel, which was really fun and experimental because I didn't have to worry too much about pulling up my cylinders perfectly, since I was going to play later on.  My favorite tool, a sponge on a stick came in handy when it came to forming the curves and different dents in these mugs.  The most laborious part was after I painted on the white flowers with underglazes, because then I had to coat them in wax, dip the cups in two glazes, and then do the clean up work.  Unfortunately, the underglazes kind of got scraped off in the cleaning process, but the runny mason stains that I sprayed on after the glaze had dried turned out really cool and I like the effect.  Maybe I'll go heavier on the green next time and not bother with the yellow drippy stains, I still have two more mug...

Feeling Sentimental About A Mushroom Pot

Image
Hi Internet realm,  So, today one of my favorite mushroom jars is off to a new home, which has me feeling very grateful but also sad.  I didn't know that parting with the things I'd be making would be this difficult, because inevitably I want them to sell too...  I think it's because of all the labor that goes into the piece, especially the physical labor on the wheel, conceptualizing, reshaping the form, looking at it from afar to make sure it's exactly how I want it.  Then the waiting time, the trimming, taking it back home to decorate it, hoping that none of the mushroom pieces pop off because the clay is drying at different times.  Then hoping that the piece makes it through bisque and the second firing without cracks or ruptures from the clay or bubbling from the glaze.  And this jar did! And he turned out really great and I was so proud of the work.  But packing him up today in bubble wrap and newspaper just left me with a sad twang in the bottom...

My First Mushroom Teapot

Image
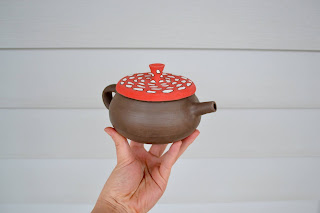
Hello Internet friends!  Worm Ceramics here. Just wanted to update whoever is out there and reading this on my mushroom teapot journey.  So I started maybe two weeks ago. I've been throwing my brown clay on the wheel, which is super plastic and smooth but also very temperamental. It doesn't like to be stretched or manipulated too much.  After throwing the body, spout, and lid, I assembled all of the pieces and pulled the handle.  The teapot was looking real cute! I could see the mushroom forms right then and there.  One of my mistakes that I should have seen coming but overlooked were the holes. I poked five of them in the body on the inside.  And, as it turned out, despite cleaning them out before firing the glaze still ran and sealed them.  With a screwdriver and hammer I managed to chip away at the glaze, but the holes are pinpricks and water flow is pathetic and just downright sad.  Still a little disappointed, was really hoping this guy would...

Struggles with Brown Clay

Image
I really do love this brown clay, it has such a loamy, deep color that I've only seen in rich, umber oil colors.  But it's just so finicky and I haven't found a way to tame it yet.   I've made twenty or so jars and a handful of planters using this brown clay. A lot of the times it cracks on the rim after being fired. Or hairline cracks surface along the body.  Sometimes pieces I attach pop off during firing.  If anyone read my other post about the clay teapot and battling the hairline crack, this is my second week trying to come out victorious.  I rehydrated the brown clay body and then used slip mixed with vinegar and toilet paper and then vigorously agitated the crack (which was creeping all along the underside of the teapot) before patching it up.  As expected, it kept reappearing, and I kept patching.  It was so stubborn!  So far, I've managed to seal the crack(s), but I have that deep, unsettling feeling that it will prevail once the tea...

An Earthy Ceramic Mushroom Jar

Image
Hello Internet readers!  Just wanted to share a short post about one of my favorite mushroom ceramic jars.  Actually, it wasn't my favorite, it was one that I didn't really like at first.  When I was making the jar and painting it I had no idea how the underglazes would look once the brown clay was fired.  After the bisque firing the whites and pinks were very flat, almost cartoonish, and the brown clay had a nutty, almost caramel surface color.  But that completely changed once it was fired for the second time and I couldn't believe how dark it had gotten, let alone what it had done to the underglazes.  I had first seen this mushroom jar from a small text photo, and seeing how the colors had muted I was at first disheartened, upset, and wanting to chuck the jar into my reject pile and move on.  But then I held it in my hands, saw up close what the clay had done with the underglazes, it was as if it had absorbed the colors and spit them back out in a h...

The Mischievous Hairline Crack on my Mushroom Teapot

Image
It's been a frustrating day. Especially with this little mushroom teapot.  I threw the body, spout, and lid on the wheel a few days ago and everything was looking good. I was really proud of the work. After three or so days I took the heat gun to stiffen him up for trimming.  Have you ever watched film develop in a chemical bath? When you slowly start to see the outlines of things and then in no time the image appears right in front of you?  That's how it was with the hairline crack on the body of the teapot. It just sort of materialized out of nowhere and then bam, there it was snaking across the clay's surface like a glacial crack.  At the time I thought ehh, no big deal, I'll just smooth it out and assemble the teapot.  The crack kept coming back.  I'd smooth it out.  It would come back. Then I'd rub at it again.  But it always came back, materializing slowly like some sort of spiteful ghost.  Smoothing it out with vinegar wasn't working e...

Saying Farewell To Another Mushroom Jar

Image
  Alas!   Another mushroom jar is off to its new home!   It's strange, ever since I started posting my ceramic mushroom jars on my Etsy page, almost each one of them I send to a buyer in California...which makes me think that maybe I should slowly be making my way West...   Anyways. This post will be short and sweet. It's really a goodbye letter to this little jar.   When I first saw this particular ceramic jar come out of the kiln I was a little disheartened (that darn self-critic in me can be too critical sometimes) because I expected the colors of the underglazes to be brighter, more eye popping. I don't know.   The light brown colors, of course, are also very delicate and beautiful in their own right, but I guess I was comparing what I had expected with the reality of the thing in front of me.   But I try to put a little bit of myself in each of the things I make, and this ceramic jar was no exception, as I can see the part of me in the shape of ...

Worm Ceramics Starts A Blog

Image
Hello to anyone who stumbles across this post. I'm Worm Ceramics .  I'm an artsy creative who makes ceramics. This blog will be dedicated to my personal ceramic journey that I hope to share with other people who are also enthusiastic about ceramics and nature.  I love simple forms and vessels. By hand I'm making mushroom themed jars, planter pots, and vases.  I also love throwing on the wheel. Right now, I'm tackling the challenge of throwing a series of teapots, which will be mushroom themed (the iconic fly agaric ((the red one!)))  Almost all of my work is inspired by nature, in particular what grows in forests and fields.  A side not, I am an amateur mushroom forager and a ton of mushroom species are inspiration for my ceramics. Mycology plays a huge role in my life and I hope to continue building up my skills as a forager and as a ceramicist.  Etsy and Instagram are the main platforms I use to show off the work that I've been producing,  as w...